

Overview
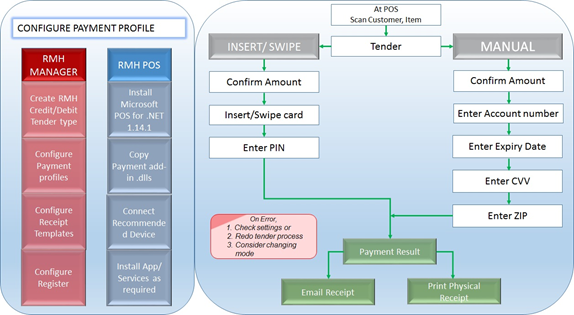
RMH Store Manager
TD Merchant Solutions - Configuring Payment Provider
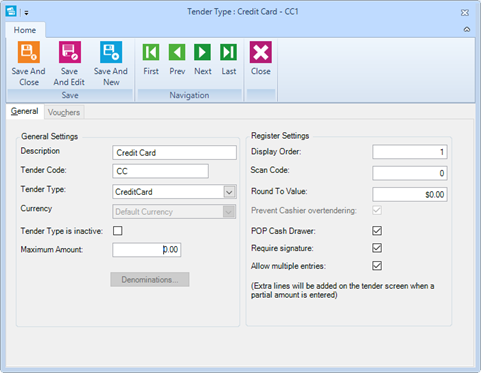
Tender Type
RMH Store Manager > Setup > Financials > Tender Types
|
No. |
Field |
Description |
|
1 |
Description |
The name by which the tender type is referenced. The name may include up to 25 characters in length. |
|
2 |
Tender Code |
The unique identification code by which the tender can be referenced. |
|
3 |
Tender Type |
Use the drop-down list box to select the type of tender (supports Credit card or Debit card) to process EFT payment at RMH POS |
|
4 |
Currency |
Select the applicable currency. To use the currency defined in your Windows setting, select the Default Currency. The Currency menu option enables you to set up all the currencies your store will use. |
|
5 |
Display Order |
Specify the order by which the tender types are displayed at the RMH POS. |
|
6 |
Allow multiple entries |
Allows cashiers to accept split payments of the same tender type, for example, when a customer wants to split payment across two VISA cards. Extra lines will be added by clicking ‘+’ at the RMH POS when a partial payment is entered. |
Note: Needs to configure different Tender Types (Credit, Debit, Food Stamp, Voucher and, EC Cash Card) as per features supported by payment provider.
Ensure Each POS Station where payment provider is configured, must Z-out in order for this change to take effect.
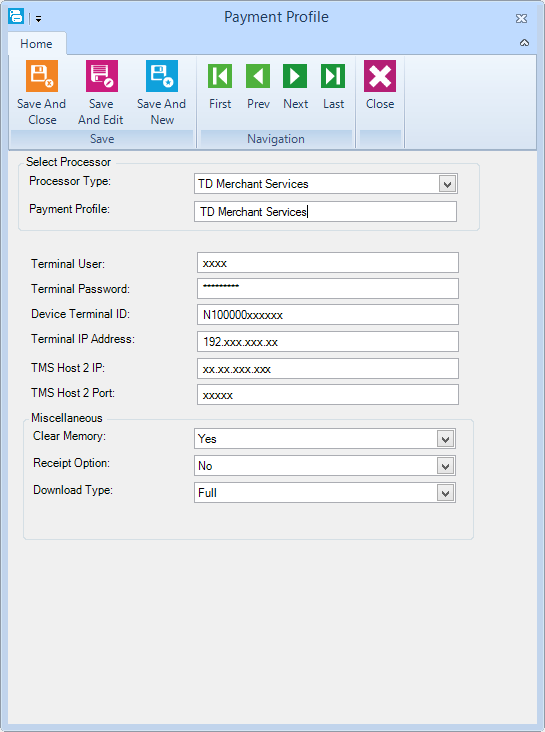
Payment Profile
RMH Store Manager > Setup > Payment Processing > Payment Profile
|
No. |
Field |
Description |
|
1 |
Payment Profile |
The name by which the payment profile is referenced. |
|
2 |
Processor Type |
Use the drop-down list box to select the processor type. |
|
3 |
Terminal User |
Enter the user name provided by TD Merchant Solutions. |
|
4 |
Terminal Password |
Enter the Password provided by TD Merchant Solutions. |
|
5 |
Device Terminal ID |
Enter the Post ID provided by TD Merchant Solutions. |
|
6 |
Terminal IP Address |
Enter the serial number of TD Merchant Solutions device. |
|
7 |
TMS Host 2 IP |
Enter the token number provided by TD Merchant Solutions |
|
8 |
TMS Host 2 Port |
Enter the TMS Host 2 Port provided by TD Merchant Solutions. |
|
9 |
Clear Memory |
Choose an option to clear a device memory. By choosing this option, all transaction, parameters will be deleted form the device memory. |
|
10 |
Receipt Option |
Choose an option to print a receipt. If cashier wants to print receipt on device then cashier can choose “Yes” option from drop down. |
|
11 |
Download Type |
Choose an option from drop down list to download parameter. Two types are there, 1. Full: To download all parameters and 2.Partial: To download partial parameters. |
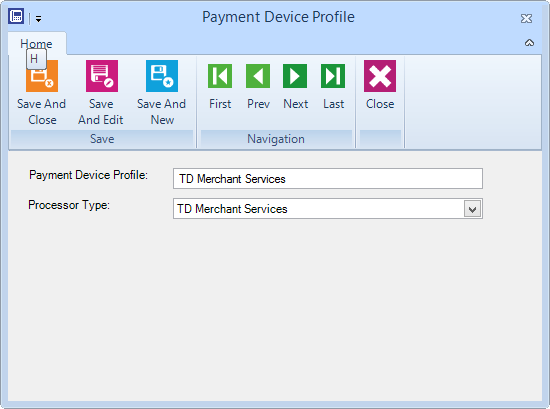
Device Profile
RMH Store Manager > Setup > Payment Processing > Device Profile
|
No. |
Field |
Description |
|
1 |
Payment Device Profile |
The name by which the payment device profile is referenced |
|
2 |
Processor Type |
Use the drop-down list box to select the processor type |
Functionality Profile
RMH Store Manager > Setup > Payment Processing > Functionality Profile
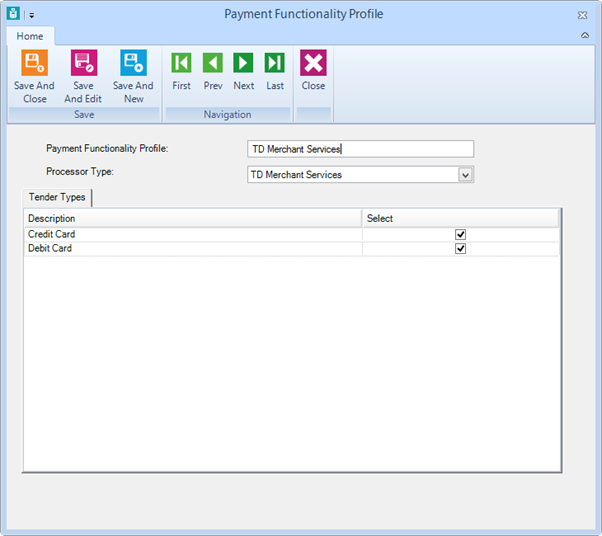
|
No. |
Field |
Description |
|
1 |
Payment Functionality Profile |
The name by which the payment functionality profile is referenced. |
|
2 |
Processor Type |
Use the drop-down list box to select the processor type |
|
3 |
Tender Types Tab |
The Tab shows Tender Types supported for selected Processor Type. Check the check box to select the tender type to be used for Card processing. |
Receipt Template
RMH Store Manager > Setup > Hardware > Receipt Templates
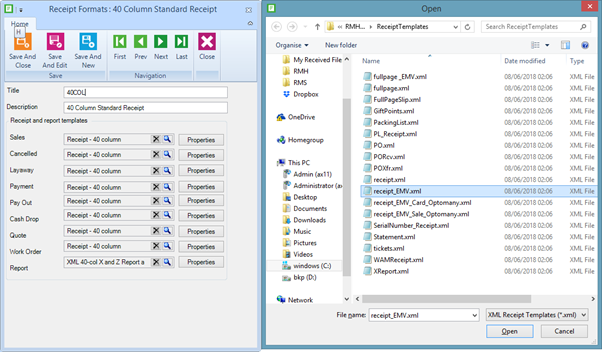
NOTE: Full Page_EMV is supported.
Register
RMH Store Manager > Setup > Hardware > Register List > POS Profile
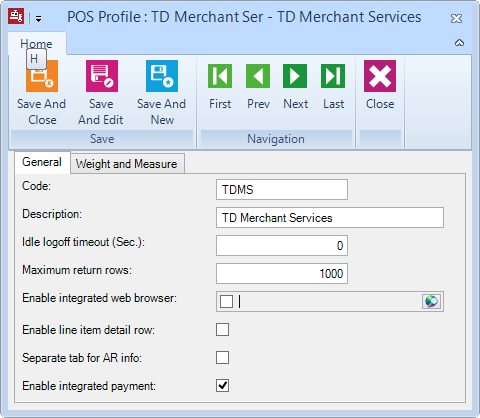
|
No. |
Field |
Description |
|
1 |
Code |
The name by which the payment functionality profile is referenced. |
|
2 |
Description |
Use the drop-down list box to select the processor type |
|
3 |
Idle logoff timeout(Sec) |
Enter POS logoff time |
|
4 |
Maximum return rows |
Returns number of rows on POS |
|
5 |
Enable integrated web browser |
Enter the URL of site |
|
6 |
Enable line item detail row |
By checking this option, line item detail row will be enable |
|
6 |
Separate tab for AR info |
By checking this option, AR info tab will generate separately |
|
7 |
Enable integrated payment |
|
RMH Store Manager > Setup > Hardware > Register List > > Register List > General Tab

RMH Store Manager > Setup > Hardware > Register List > Receipt Printer1 Tab \ Payment Profile Tab
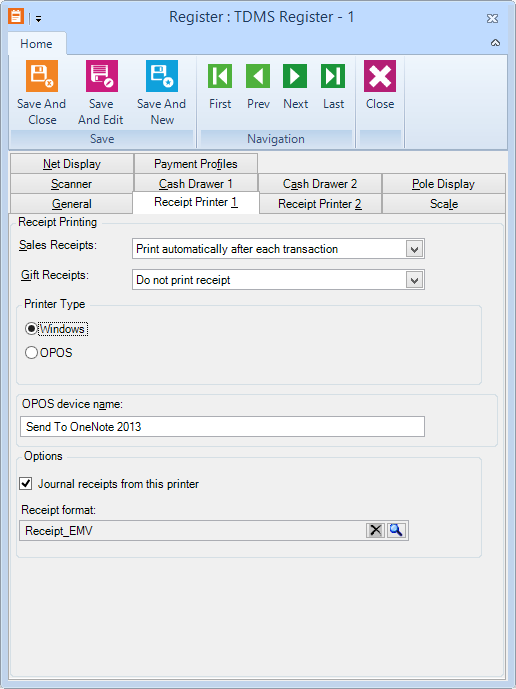
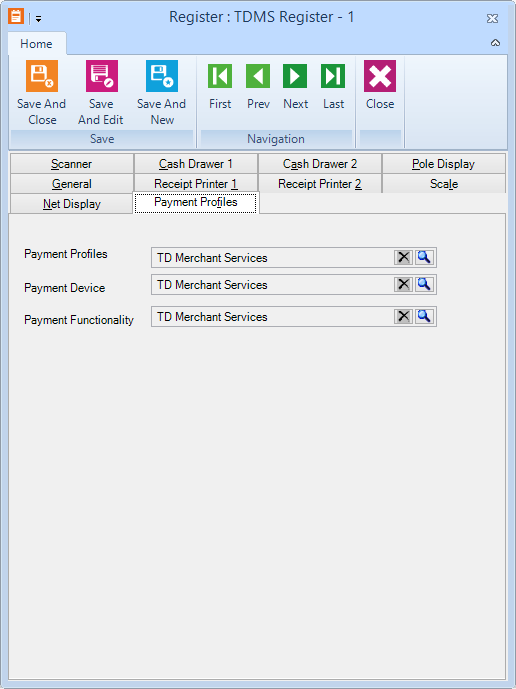
|
No. |
Field |
Description |
|
1 |
Receipt Printer1\2 Tab |
Use this tab to configure printing option, printer and journal receipt. |
|
2 |
Payment Profiles Tab |
Use this tab to configure payment profile to use at RMH POS register |
RMH Store Administrator
Register Settings
RMH Administrator > Configuration > Register Tab
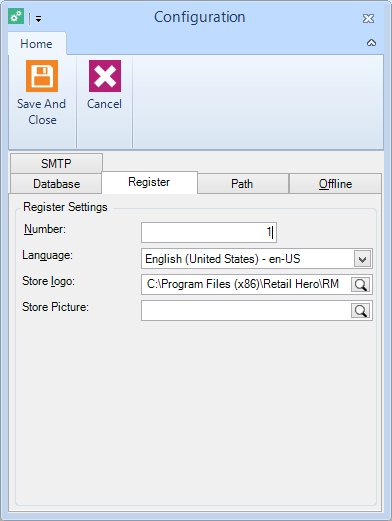
|
No. |
Fields |
Description |
|
1 |
Number |
Enter the unique register number to work on. |
|
|
|
|
NOTE: On Each POS station, configure the correct register number in RMH Store Administrator.
The Number where Payment Provider is configured to work on.
RMH Manager – POS
Install Payment AddIn and Custom Panel at RMH POS
- Install Payment Addins from setup
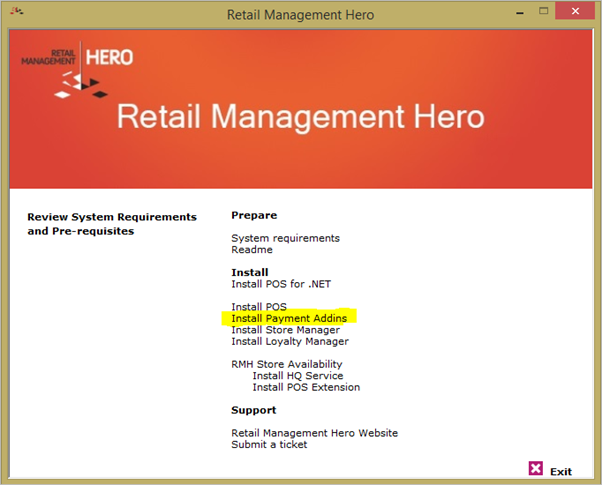
- Copy “Custom Panel” from RMH Store Manager Installation path (For e.g. “C:\Program Files (x86)\Retail Hero\RMH Store Manager\Panels”) and replace this to “Panels” folder at RMH POS installation path (“C:\Program Files (x86)\Retail Hero\RMH POS\Panels”).
- Note: The above path relates to a 64bit machine. Select the correct path on 32bit machine.
Installing the physical device (Drivers and plugging in)
- Connect LAN cable to the device.
Prerequisites
- Prerequisites
- Once you finished configuring the payment provider at RMH Store Manager, start RMH POS and ensure to run Z or ZZ report, to enable Tender type configured. Restart RMH POS.
- Device must be connected to each RMH POS terminal where payment provider is configured.
Working at RMH POS - TD Merchant Solutions
Swipe
Sale – Swipe/Insert Credit
|
1 |
Scan Customer |
|
2 |
Scan Items |
|
3 |
Tender the transaction (F12) |
|
4 |
Select the configured tender type |
|
5 |
Confirm amount on Device |
|
6 |
Swipe the Card on Device |
|
7 |
Follow the instruction on device |
|
8 |
Click Finish on Payment Result window and complete transaction |
|
9 |
Email receipt \ Print receipt if configured |
- Sales Receipt, Merchant Copy, Customer Copy will be printed if configured in RMH Manager on this terminal or you can Email receipts if configured SMTP details in RMH Administrator.
Void – Credit Sale
|
1 |
Recall transaction for void (Transaction > Recall Transaction > Recall for Void) |
|
2 |
Select the transaction to Recall. |
|
3 |
Tender the transaction. |
|
4 |
Follow the instruction on device |
|
5 |
Click Finish on Payment Result window and complete transaction |
|
6 |
Email receipt \ Print receipt if configured |
- Sales Receipt, Merchant Copy, Customer Copy will be printed if configured in RMH Manager on this terminal or you can Email receipts if configured SMTP details in RMH Administrator.
Sale – Swipe Debit
|
1 |
Scan Customer |
|
2 |
Scan Items |
|
3 |
Tender the transaction (F12) |
|
4 |
Select the configured tender type |
|
5 |
Confirm amount on Device |
|
6 |
Select the sale –Card type |
|
7 |
Swipe the card |
|
8 |
Enter PIN |
|
9 |
Follow the instruction on device |
|
10 |
Click Finish on Payment Result window and complete transaction |
|
11 |
Email receipt \ Print receipt if configured |
- Sales Receipt, Merchant Copy, Customer Copy will be printed if configured in RMH Manager on this terminal or you can Email receipts if configured SMTP details in RMH Administrator.
Return Sale – Debit
|
1 |
Recall transaction for Return (Transaction > Recall Transaction > Recall for Return) |
|
2 |
Select the transaction to Recall. |
|
3 |
Tender the transaction. |
|
4 |
Select the configured tender type |
|
5 |
Confirm amount on Device |
|
6 |
Swipe Card |
|
7 |
Enter PIN |
|
8 |
Follow the instruction on device |
|
9 |
Click Finish on Payment Result window and complete transaction |
|
10 |
Email receipt \ Print receipt if configured |
- Sales Receipt, Merchant Copy, Customer Copy will be printed if configured in RMH Manager on this terminal or you can Email receipts if configured SMTP details in RMH Administrator.
Manual
Sale – Manual
|
1 |
Scan Customer |
|
2 |
Scan Items |
|
3 |
Tender the transaction (F12) |
|
4 |
Select the configured tender type |
|
5 |
Select the Sale – Press Manual button n device |
|
6 |
Confirm amount on Device |
|
7 |
Enter Card Number |
|
8 |
Enter the Expiry Date |
|
9 |
Enter the CVV |
|
10 |
Follow the instruction on device |
|
11 |
Click Finish on Payment Result window and complete transaction |
|
12 |
Email receipt \ Print receipt if configured |
- Sales Receipt, Merchant Copy, Customer Copy will be printed if configured in RMH Manager on this terminal or you can Email receipts if configured SMTP details in RMH Administrator.
Void – Manual Sale
|
1 |
Recall transaction for void (Transaction > Recall Transaction > Recall for Void) |
|
2 |
Select the transaction to Recall. |
|
3 |
Tender the transaction. |
|
4 |
Click Finish on Payment Result Window and complete transaction |
|
5 |
Email receipt \ Print receipt if configured |
- Sales Receipt, Merchant Copy, Customer Copy will be printed if configured in RMH Manager on this terminal or you can Email receipts if configured SMTP details in RMH Administrator.
Return – Manual Sale
|
1 |
2) Recall transaction for Return (Transaction > Recall Transaction > Recall for Return) |
|
2 |
4) Select the transaction to Recall |
|
3 |
6) Tender the transaction. |
|
4 |
Select the configured tender type |
|
5 |
Select the sale – Manual |
|
6 |
Confirm amount on device |
|
7 |
Enter Card Number |
|
8 |
Enter the Expiry Date |
|
9 |
Enter the CVV |
|
10 |
Enter the Zip Code |
|
11 |
Follow the instruction on device |
|
12 |
Click Finish on Payment Result window and complete transaction |
|
13 |
Email receipt \ Print receipt if configured |
- Sales Receipt, Merchant Copy, Customer Copy will be printed if configured in RMH Manager on this terminal or you can Email receipts if configured SMTP details in RMH Administrator.
RMH POS – Work Order \ Layaway \ Back Order \ Quote
- Note: Supports payment of all above order types at RMH POS when transaction have single tender. Multi tender not allowed in above order types transaction.
- Sales Receipt, Merchant Copy, Customer Copy will be printed if configured in RMH Store Manager on this terminal or you can Email receipts if configured SMTP details in RMH Administrator.
Note: All receipts will be generated after completion of transaction
RMH POS – Return
|
1 |
Set RMH POS Return mode |
|
2 |
Scan Item |
|
3 |
Tender the transaction. |
|
4 |
Select the configured tender type |
|
5 |
Select the sale – Insert\Swipe OR Manual |
|
6 |
Confirm the amount on device |
|
7 |
Follow the instruction on device |
|
8 |
Click Finish on Payment Result window and complete transaction |
|
9 |
Email receipt \ Print receipts if configured |
- Note: The POS system will return transaction by card as per return policies derived by Store and Payment Provider not by Retail Management Hero.
- Sales Receipt, Merchant Copy, Customer Copy will be printed if configured in RMH Store Manager on this terminal or you can Email receipts if configured SMTP details in RMH Administrator.
Gift Card
- Note: This version is not supported Gift Card.
Cash Back
- Note: This version is not supported Cash Back.
EBT\Food Stamp
- Note: This version is not supported EBT\Food stamp.
Tip\Gratuity
- Note: This version does not support Tip\Gratuity.
Decline Receipt
- Note: This version is supported decline receipt.
Comments
0 comments
Please sign in to leave a comment.